今回は、Linuxクローンツール「Relax-and-Recover」を使って、簡単にクローン環境を作成する手順をご紹介します。
Relax-and-Recover(ReaR)とは
Relax-and-Recover (ReaR)はLinuxシステムのバックアップを行える管理ツールです。
ライセンスは、GNU GENERAL PUBLIC LICENSE Version 3で公開されています。
そのため費用は一切かかりません。
システムブートを行える*.isoイメージを作成することができ、ディスクのパーティション情報を含めてシステム構成やデータを簡単に復旧できます。
今回の環境
- RedHat Linux 8.5
- BIOSとEFI環境で検証しています。
インストール
Relax-and-Recover (rear) と関連パッケージをインストールします。
rearインストール
# dnf -y install rear# dnf -y install rear
サブスクリプション管理リポジトリーを更新しています。
メタデータの期限切れの最終確認: 0:05:09 時間前の 2022年04月05日 09時56分41秒 に実施しました。
依存関係が解決しました。
========================================================================================================================================
パッケージ アーキテクチャー バージョン リポジトリー サイズ
========================================================================================================================================
インストール:
rear x86_64 2.6-3.el8 rhel-8-for-x86_64-appstream-rpms 774 k
依存関係のインストール:
bind-export-libs x86_64 32:9.11.26-6.el8 rhel-8-for-x86_64-baseos-rpms 1.1 M
dhcp-client x86_64 12:4.3.6-45.el8 rhel-8-for-x86_64-baseos-rpms 318 k
dhcp-common noarch 12:4.3.6-45.el8 rhel-8-for-x86_64-baseos-rpms 207 k
dhcp-libs x86_64 12:4.3.6-45.el8 rhel-8-for-x86_64-baseos-rpms 148 k
ipcalc x86_64 0.2.4-4.el8 rhel-8-for-x86_64-baseos-rpms 38 k
libburn x86_64 1.4.8-3.el8 rhel-8-for-x86_64-appstream-rpms 173 k
libisoburn x86_64 1.4.8-4.el8 rhel-8-for-x86_64-appstream-rpms 410 k
libisofs x86_64 1.4.8-3.el8 rhel-8-for-x86_64-appstream-rpms 221 k
syslinux x86_64 6.04-5.el8 rhel-8-for-x86_64-baseos-rpms 578 k
syslinux-nonlinux noarch 6.04-5.el8 rhel-8-for-x86_64-baseos-rpms 554 k
xorriso x86_64 1.4.8-4.el8 rhel-8-for-x86_64-appstream-rpms 281 k
トランザクションの概要
========================================================================================================================================
インストール 12 パッケージ
ダウンロードサイズの合計: 4.8 M
インストール後のサイズ: 11 M
パッケージのダウンロード:
(1/12): ipcalc-0.2.4-4.el8.x86_64.rpm 186 kB/s | 38 kB 00:00
(2/12): syslinux-6.04-5.el8.x86_64.rpm 2.4 MB/s | 578 kB 00:00
(3/12): syslinux-nonlinux-6.04-5.el8.noarch.rpm 2.1 MB/s | 554 kB 00:00
(4/12): dhcp-libs-4.3.6-45.el8.x86_64.rpm 874 kB/s | 148 kB 00:00
(5/12): dhcp-client-4.3.6-45.el8.x86_64.rpm 1.8 MB/s | 318 kB 00:00
(6/12): dhcp-common-4.3.6-45.el8.noarch.rpm 1.2 MB/s | 207 kB 00:00
(7/12): bind-export-libs-9.11.26-6.el8.x86_64.rpm 5.6 MB/s | 1.1 MB 00:00
(8/12): libburn-1.4.8-3.el8.x86_64.rpm 1.0 MB/s | 173 kB 00:00
(9/12): libisofs-1.4.8-3.el8.x86_64.rpm 1.3 MB/s | 221 kB 00:00
(10/12): xorriso-1.4.8-4.el8.x86_64.rpm 1.6 MB/s | 281 kB 00:00
(11/12): libisoburn-1.4.8-4.el8.x86_64.rpm 2.2 MB/s | 410 kB 00:00
(12/12): rear-2.6-3.el8.x86_64.rpm 4.2 MB/s | 774 kB 00:00
----------------------------------------------------------------------------------------------------------------------------------------
合計 6.1 MB/s | 4.8 MB 00:00
トランザクションの確認を実行中
トランザクションの確認に成功しました。
トランザクションのテストを実行中
トランザクションのテストに成功しました。
トランザクションを実行中
準備 : 1/1
インストール中 : libisofs-1.4.8-3.el8.x86_64 1/12
scriptletの実行中: libisofs-1.4.8-3.el8.x86_64 1/12
インストール中 : libburn-1.4.8-3.el8.x86_64 2/12
scriptletの実行中: libburn-1.4.8-3.el8.x86_64 2/12
インストール中 : libisoburn-1.4.8-4.el8.x86_64 3/12
scriptletの実行中: libisoburn-1.4.8-4.el8.x86_64 3/12
インストール中 : xorriso-1.4.8-4.el8.x86_64 4/12
scriptletの実行中: xorriso-1.4.8-4.el8.x86_64 4/12
インストール中 : syslinux-6.04-5.el8.x86_64 5/12
インストール中 : syslinux-nonlinux-6.04-5.el8.noarch 6/12
インストール中 : bind-export-libs-32:9.11.26-6.el8.x86_64 7/12
scriptletの実行中: bind-export-libs-32:9.11.26-6.el8.x86_64 7/12
インストール中 : dhcp-common-12:4.3.6-45.el8.noarch 8/12
インストール中 : dhcp-libs-12:4.3.6-45.el8.x86_64 9/12
インストール中 : ipcalc-0.2.4-4.el8.x86_64 10/12
インストール中 : dhcp-client-12:4.3.6-45.el8.x86_64 11/12
scriptletの実行中: rear-2.6-3.el8.x86_64 12/12
インストール中 : rear-2.6-3.el8.x86_64 12/12
scriptletの実行中: rear-2.6-3.el8.x86_64 12/12
検証 : ipcalc-0.2.4-4.el8.x86_64 1/12
検証 : syslinux-nonlinux-6.04-5.el8.noarch 2/12
検証 : syslinux-6.04-5.el8.x86_64 3/12
検証 : dhcp-libs-12:4.3.6-45.el8.x86_64 4/12
検証 : dhcp-client-12:4.3.6-45.el8.x86_64 5/12
検証 : dhcp-common-12:4.3.6-45.el8.noarch 6/12
検証 : bind-export-libs-32:9.11.26-6.el8.x86_64 7/12
検証 : libburn-1.4.8-3.el8.x86_64 8/12
検証 : libisofs-1.4.8-3.el8.x86_64 9/12
検証 : libisoburn-1.4.8-4.el8.x86_64 10/12
検証 : xorriso-1.4.8-4.el8.x86_64 11/12
検証 : rear-2.6-3.el8.x86_64 12/12
インストール済みの製品が更新されています。
インストール済み:
bind-export-libs-32:9.11.26-6.el8.x86_64 dhcp-client-12:4.3.6-45.el8.x86_64 dhcp-common-12:4.3.6-45.el8.noarch
dhcp-libs-12:4.3.6-45.el8.x86_64 ipcalc-0.2.4-4.el8.x86_64 libburn-1.4.8-3.el8.x86_64
libisoburn-1.4.8-4.el8.x86_64 libisofs-1.4.8-3.el8.x86_64 rear-2.6-3.el8.x86_64
syslinux-6.04-5.el8.x86_64 syslinux-nonlinux-6.04-5.el8.noarch xorriso-1.4.8-4.el8.x86_64
完了しました!grub2-efi-x64-modulesインストール
# dnf -y install grub2-efi-x64-modules# dnf -y install grub2-efi-x64-modules
サブスクリプション管理リポジトリーを更新しています。
メタデータの期限切れの最終確認: 0:05:56 時間前の 2022年04月05日 09時56分41秒 に実施しました。
依存関係が解決しました。
========================================================================================================================================
パッケージ アーキテクチャー バージョン リポジトリー サイズ
========================================================================================================================================
インストール:
grub2-efi-x64-modules noarch 1:2.02-106.el8 rhel-8-for-x86_64-baseos-rpms 1.1 M
トランザクションの概要
========================================================================================================================================
インストール 1 パッケージ
ダウンロードサイズの合計: 1.1 M
インストール後のサイズ: 5.5 M
パッケージのダウンロード:
grub2-efi-x64-modules-2.02-106.el8.noarch.rpm 4.1 MB/s | 1.1 MB 00:00
----------------------------------------------------------------------------------------------------------------------------------------
合計 4.1 MB/s | 1.1 MB 00:00
トランザクションの確認を実行中
トランザクションの確認に成功しました。
トランザクションのテストを実行中
トランザクションのテストに成功しました。
トランザクションを実行中
準備 : 1/1
インストール中 : grub2-efi-x64-modules-1:2.02-106.el8.noarch 1/1
scriptletの実行中: grub2-efi-x64-modules-1:2.02-106.el8.noarch 1/1
検証 : grub2-efi-x64-modules-1:2.02-106.el8.noarch 1/1
インストール済みの製品が更新されています。
インストール済み:
grub2-efi-x64-modules-1:2.02-106.el8.noarch
完了しました!コンフィグファイルの編集
Relax-and-Recover (ReaR)の設定は、/etc/rear/local.conf に定義します。
詳細は man rear コマンドで各種内容を確認できますので、そちらを確認してみてください。
今回の設定内容は以下の通りです。
- ISOイメージとして出力
- ファイル出力先はマウント済みのNAS(NFS)/hoge/rear/
- 出力イメージにデータバックアップを含む
とりあえず、まるっとバックアップしてまるっとリストアする作戦です。
/etc/rear/local.conf
---
OUTPUT=ISO
OUTPUT_URL=file:///hoge/rear/
BACKUP=NETFS
BACKUP_URL=iso:///backup/
---出力先、OUTPUT_URL=file:///XXX/ は任意で変更してください。
それ以外はこのままでOKです。
rearコマンドの実行
/etc/rear/local.conf ファイルを設定したら、バックアップを実行します。
今回はログ出力を詳細モードとなるようにオプション -vをつけています。
また、BIOS環境とEFI環境でログ内容がちがう結果になったので、2つの実行結果を表示しています。
# rear -v mkbackup# rear -v mkbackup
Relax-and-Recover 2.6 / 2020-06-17
Running rear mkbackup (PID 230231)
Using log file: /var/log/rear/rear-demo-003.log
Running workflow mkbackup on the normal/original system
Using backup archive '/tmp/rear.Ghiyi7S6GamFKy5/tmp/isofs/backup//backup.tar.gz'
Using autodetected kernel '/boot/vmlinuz-4.18.0-348.el8.x86_64' as kernel in the recovery system
Creating disk layout
Overwriting existing disk layout file /var/lib/rear/layout/disklayout.conf
Using guessed bootloader 'GRUB' (found in first bytes on /dev/sda)
Verifying that the entries in /var/lib/rear/layout/disklayout.conf are correct ...
Creating recovery system root filesystem skeleton layout
To log into the recovery system via ssh set up /root/.ssh/authorized_keys or specify SSH_ROOT_PASSWORD
Copying logfile /var/log/rear/rear-demo-003.log into initramfs as '/tmp/rear-demo-003-partial-2022-04-05T15:27:19+09:00.log'
Copying files and directories
Copying binaries and libraries
Copying all kernel modules in /lib/modules/4.18.0-348.el8.x86_64 (MODULES contains 'all_modules')
Copying all files in /lib*/firmware/
Symlink '/usr/lib/modules/4.18.0-348.el8.x86_64/build' -> '/usr/src/kernels/4.18.0-348.el8.x86_64' refers to a non-existing directory on the recovery system.
It will not be copied by default. You can include '/usr/src/kernels/4.18.0-348.el8.x86_64' via the 'COPY_AS_IS' configuration variable.
Symlink '/usr/lib/modules/4.18.0-348.el8.x86_64/source' -> '/usr/src/kernels/4.18.0-348.el8.x86_64' refers to a non-existing directory on the recovery system.
It will not be copied by default. You can include '/usr/src/kernels/4.18.0-348.el8.x86_64' via the 'COPY_AS_IS' configuration variable.
Testing that the recovery system in /tmp/rear.Ghiyi7S6GamFKy5/rootfs contains a usable system
Creating recovery/rescue system initramfs/initrd initrd.cgz with gzip default compression
Created initrd.cgz with gzip default compression (438721695 bytes) in 46 seconds
Making backup (using backup method NETFS)
Creating tar archive '/tmp/rear.Ghiyi7S6GamFKy5/tmp/isofs/backup//backup.tar.gz'
Archived 2591 MiB [avg 7604 KiB/sec] OK
Archived 2591 MiB in 350 seconds [avg 7582 KiB/sec]
Making ISO image
Wrote ISO image: /var/lib/rear/output/rear-demo-003.iso (3.0G)
Copying resulting files to file location
Saving /var/log/rear/rear-demo-003log as rear-demo-003.log to file location
Copying result files '/var/lib/rear/output/rear-demo-003.iso /tmp/rear.Ghiyi7S6GamFKy5/tmp/VERSION /tmp/rear.Ghiyi7S6GamFKy5/tmp/README /tmp/rear.Ghiyi7S6GamFKy5/tmp/rear-demo-003.log' to /project5/infosys/rear//demo-003 at file location
Exiting rear mkbackup (PID 230231) and its descendant processes ...
Running exit tasks
# rear -v mkbackup
Relax-and-Recover 2.6 / 2020-06-17
Running rear mkbackup (PID 8039)
Using log file: /var/log/rear/rear-demo-003.log
Running workflow mkbackup on the normal/original system
Using backup archive '/tmp/rear.xwIBKXj7P99uSrI/tmp/isofs/backup//backup.tar.gz'
Using UEFI Boot Loader for Linux (USING_UEFI_BOOTLOADER=1)
Using autodetected kernel '/boot/vmlinuz-4.18.0-348.el8.x86_64' as kernel in the recovery system
Creating disk layout
Overwriting existing disk layout file /var/lib/rear/layout/disklayout.conf
Using guessed bootloader 'EFI' (found in first bytes on /dev/sda)
Verifying that the entries in /var/lib/rear/layout/disklayout.conf are correct ...
Creating recovery system root filesystem skeleton layout
To log into the recovery system via ssh set up /root/.ssh/authorized_keys or specify SSH_ROOT_PASSWORD
Trying to find what to use as UEFI bootloader...
Trying to find a 'well known file' to be used as UEFI bootloader...
Using '/boot/efi/EFI/redhat/grubx64.efi' as UEFI bootloader file
Copying logfile /var/log/rear/rear-demo-003.log into initramfs as '/tmp/rear-demo-003-partial-2022-04-06T09:01:24+09:00.log'
Copying files and directories
Copying binaries and libraries
Copying all kernel modules in /lib/modules/4.18.0-348.el8.x86_64 (MODULES contains 'all_modules')
Copying all files in /lib*/firmware/
Symlink '/usr/lib/modules/4.18.0-348.el8.x86_64/source' -> '/usr/src/kernels/4.18.0-348.el8.x86_64' refers to a non-existing directory on the recovery system.
It will not be copied by default. You can include '/usr/src/kernels/4.18.0-348.el8.x86_64' via the 'COPY_AS_IS' configuration variable.
Symlink '/usr/lib/modules/4.18.0-348.el8.x86_64/build' -> '/usr/src/kernels/4.18.0-348.el8.x86_64' refers to a non-existing directory on the recovery system.
It will not be copied by default. You can include '/usr/src/kernels/4.18.0-348.el8.x86_64' via the 'COPY_AS_IS' configuration variable.
Testing that the recovery system in /tmp/rear.xwIBKXj7P99uSrI/rootfs contains a usable system
Creating recovery/rescue system initramfs/initrd initrd.cgz with gzip default compression
Created initrd.cgz with gzip default compression (435753335 bytes) in 45 seconds
Making backup (using backup method NETFS)
Creating tar archive '/tmp/rear.xwIBKXj7P99uSrI/tmp/isofs/backup//backup.tar.gz'
Archived 3054 MiB [avg 8591 KiB/sec] OK
WARNING: tar ended with return code 1 and below output:
  ---snip---
  tar: /var/lib/sss/pipes/private/sbus-dp_implicit_files.932: socket ignored
  tar: /var/lib/sss/pipes/private/sbus-monitor: socket ignored
  tar: /var/lib/pcp/pmcd/root.socket: socket ignored
  ----------
This means that files have been modified during the archiving
process. As a result the backup may not be completely consistent
or may not be a perfect copy of the system. Relax-and-Recover
will continue, however it is highly advisable to verify the
backup in order to be sure to safely recover this system.

Archived 3054 MiB in 365 seconds [avg 8567 KiB/sec]
GRUB2 modules to load: ext2 fat part_gpt
Did not find /boot/grub2/locale files (minor issue for UEFI ISO boot)
Making ISO image
Wrote ISO image: /var/lib/rear/output/rear-demo-003.iso (3.5G)
Copying resulting files to file location
Saving /var/log/rear/rear-demo-003.log as rear-demo-003.log to file location
Copying result files '/var/lib/rear/output/rear-demo-003.iso /tmp/rear.xwIBKXj7P99uSrI/tmp/VERSION /tmp/rear.xwIBKXj7P99uSrI/tmp/README /tmp/rear.xwIBKXj7P99uSrI/tmp/rear-demo-003.log' to /project5/infosys/rear//demo-003 at file location
Exiting rear mkbackup (PID 8039) and its descendant processes ...
Running exit tasks
Did not find /boot/grub2/locale files (minor issue for UEFI ISO boot)
がEFI環境で出力されていますが、念のためRedHatに問い合わせたところ、単純にファイルメッセージだから無視してよいとのことでした。
出力データ
指定した出力先(/hoge/rear/)に ホスト名(今回の環境は demo-003)のフォルダが作成され、以下のファイルが出力されます。
-rw------- 1 root root        202  4月  5 15:34 README
-rw------- 1 root root        272  4月  5 15:34 VERSION
-rw------- 1 root root 3185993728  4月  5 15:34 rear-demo-003.iso
-rw------- 1 root root     161686  4月  5 15:34 rear-demo-003.log
リカバリ(クローン作成)
バックアップイメージを適用する際は、以下の注意点があります。
-
コピー先のディスクサイズは、同等かそれ以上の容量が必要。
- BIOS環境で取得したイメージはBIOS環境のシステムへ、EFI環境で取得したイメージはEFI環境のシステムへのみリカバリが可能。
リカバリの実行(BIOS環境)
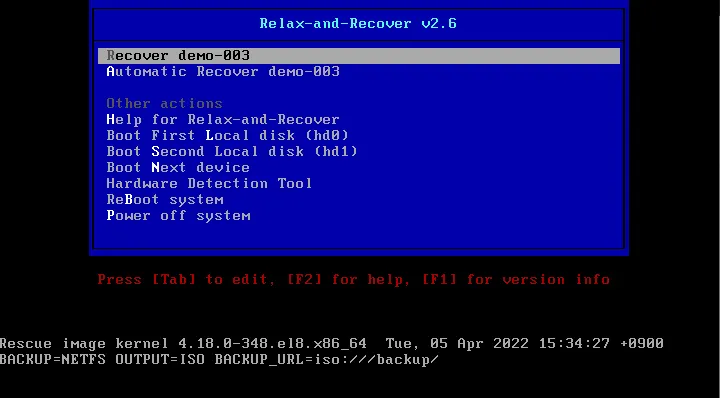
- バックアップした ISOイメージを指定してブートします。
- 「Relax-and-Recover」のメニュー画面が起動するので、上段の Recover ホスト名 (ここでは Recover demo-003)を選択し、[Enter]キーを押します。

- ログインプロンプトが表示されるので、root を入力し、[Enter]キーを押します。(パスワードは不要です。)
![]()
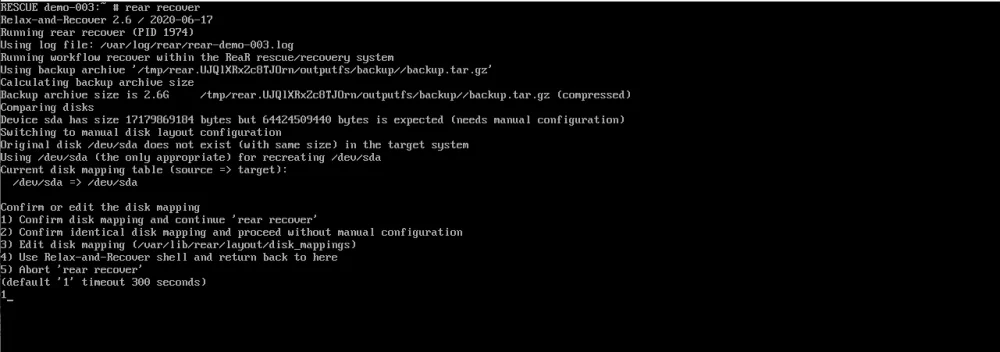
- コマンド入力の画面で rear recover を入力し、[Enter]キーを押します。
# rear recoverConfirm or edit the disk mapping の選択メニューが表示されたら、1 を入力し[Enter]キーを押します。
*何も選択しないと5分後に自動的に1が選択され処理が実行されます。
![]()
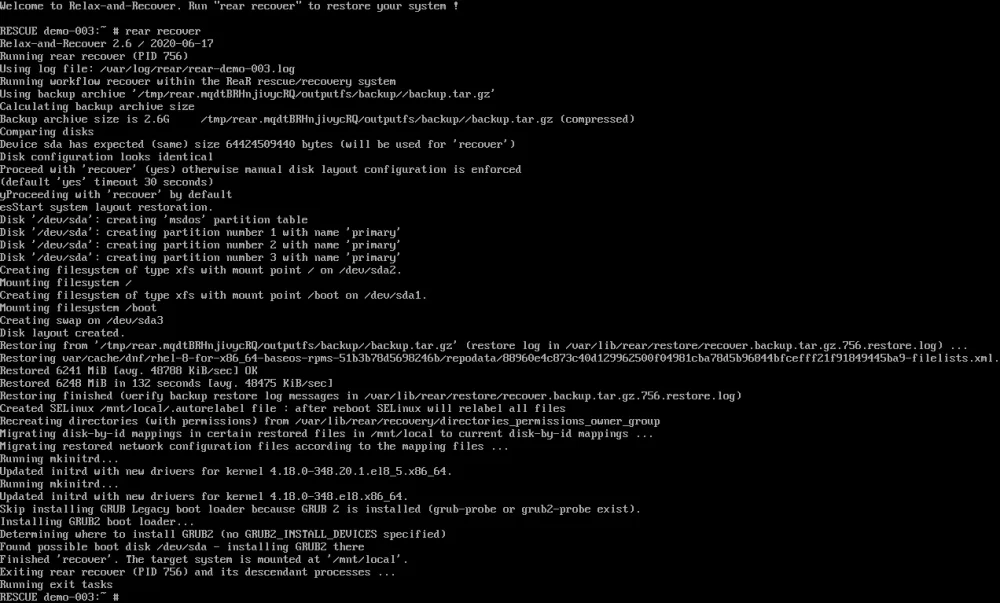
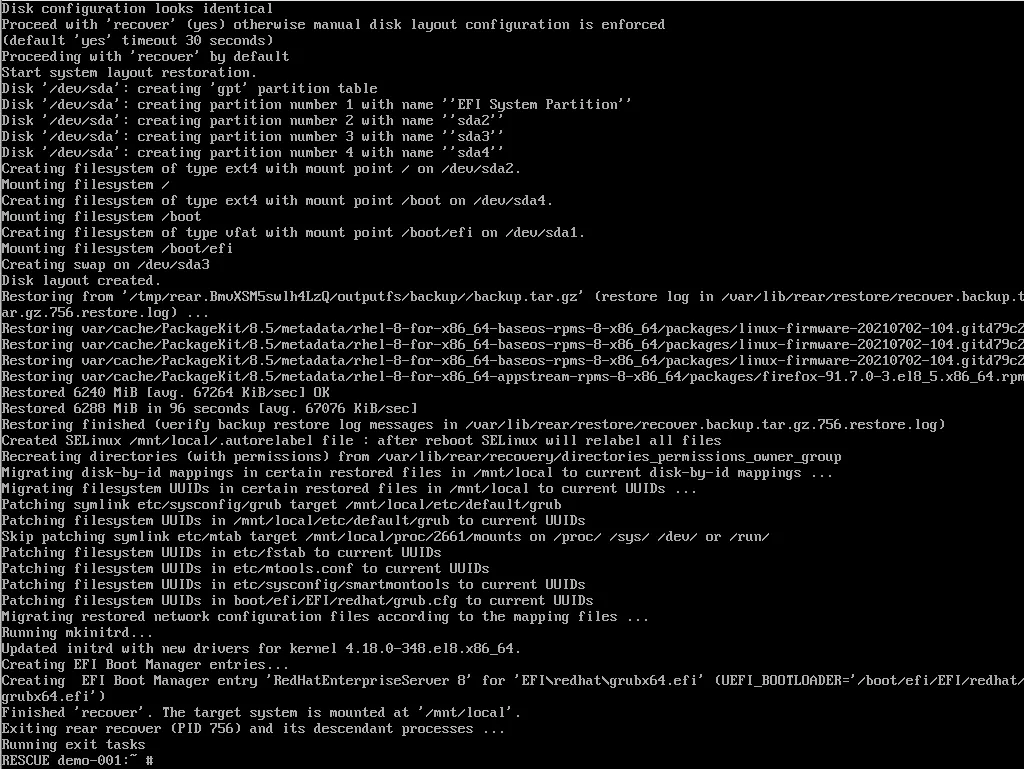
- リカバリが完了すると、通常のコマンド入力画面に戻ります。
![]()
- コマンドを入力し、システムを再起動します。
# exit # reboot - リカバリされたマシンが起動したら、各種動作確認等を実施します。
必要に応じてIPアドレスやホスト名を変更します。
作業は以上です。
リカバリの実行(EFI環境)
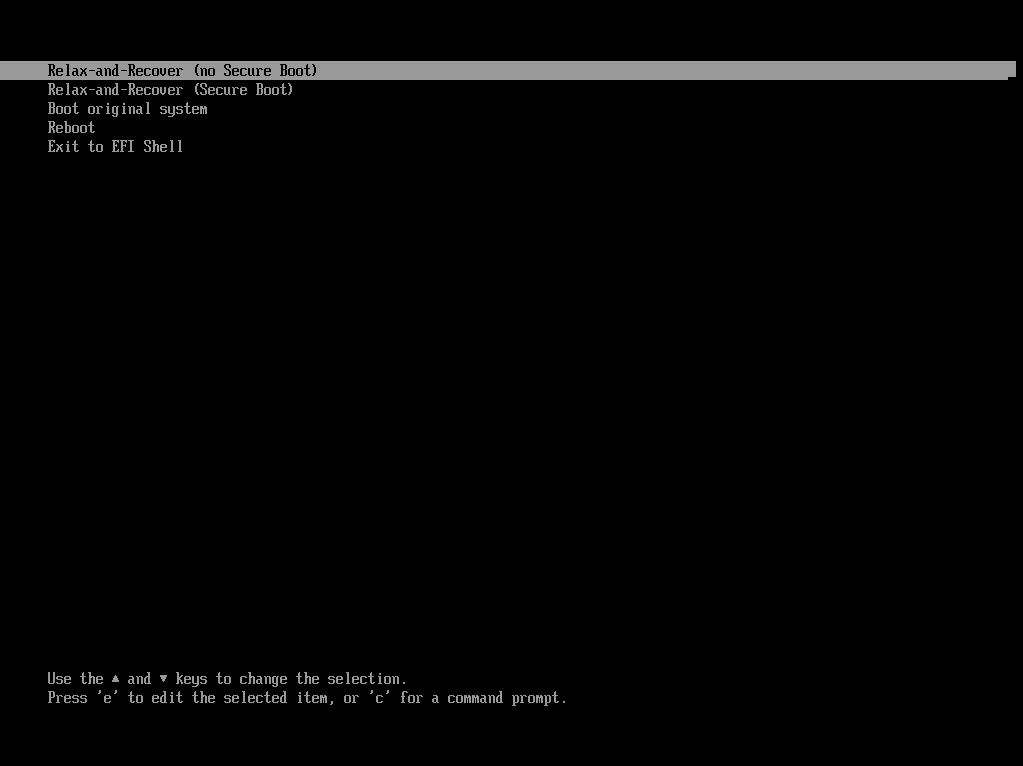
- バックアップした ISOイメージを指定してブートします。
- Relas-and-Recover (no Secure Boot) を選択し、[Enter]キーを押します。
![]()
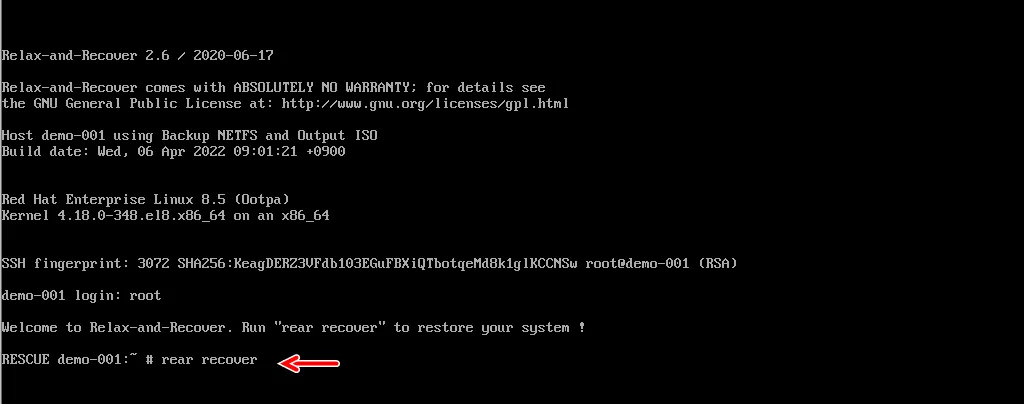
- ログインプロンプトが表示されるので、root を入力し、[Enter]キーを押します。(パスワードは不要です。)
![]()
- コマンド入力の画面で rear recover を入力し、[Enter]キーを押します。
# rear recover![]()
- リカバリが完了すると、通常のコマンド入力画面に戻ります。
![]()
- コマンドを入力し、システムを再起動します。
# exit # reboot - リカバリされたマシンが起動したら、各種動作確認等を実施します。
必要に応じてIPアドレスやホスト名を変更します。
作業は以上です。
まとめ
物理サーバーの検証環境準備や、同じ構成のサーバーを複数台導入するケースはあると思います。
お金をかけずに簡単にクローン環境が作成できるRelax-and-Recover(ReaR)は使い方を覚えておくと良いですね。


